Knowledge Level: Beginner
Retül founder and bike fitting guru Todd Carver tells you how to optimise your time trial and triathlon bike fit at home.
For triathletes and time trialists that are not going to get a full fit on their bicycle (old or new) there are some simple techniques that can be done at home to create a proper racing position. The tools that are needed are: stationary trainer (turbo), front wheel block, 4 ft spirit level (or tape measure), metric allen keys, felt tip marker or stickers.
Setup
The setup is very important for accuracy of these techniques. Basically, you need to get the bike stationary, stable, level to the horizon, and vertically straight (not leaning to one side or another as you sit on it). Here are the steps:
1. Pump up your tires to recommended settings.
2. Replace bicycles rear skewer with the one that comes with the trainer. This will ensure that the bike is fairly vertical and does not lean to a side. This is also a safety issue.
3. Set bike in trainer according to manufacturer recommendations.
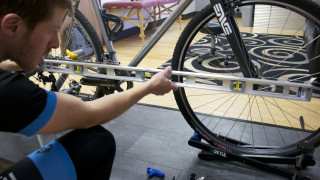
4. Place the front wheel block under the front wheel so the bike is level to the horizon. The best way to do this is to place one end of a 4 ft carpenters level in the middle of the rear axle (now affixed in the trainer) and extend the other end towards the front axle. Then adjust the front wheel height until the axles are level.
5. Visually inspect the bike to see that it is vertical (not leaning laterally)
6. Adjust saddle angle so that the front 2/3’s of the saddle is level to the ground. For shaped or anatomical saddles, this means that the rear of the saddle will actually rise above the front of the saddle for proper sit bone support and provide relief to the anterior soft tissue of the genitalia. Word of warning, within reason this saddle angle is subject to personal preference and some small amount of variability between brands.
7. Set handlebar rotation so that the grips on the base bar are angled slightly upward for proper control when cornering. Set the rotation of the aero bars so the hands sit slightly higher than the elbows. The elbow pad itself should be fairly level to slightly angled upward. There will be some differences here depending on the shape of your extensions (ski bend, S-bend, etc)
8. Stems are usually able to be positioned either up or down. Start with the stem angled downward. Most stems are +/- 6⁰ to +/- 20⁰
9. If adjustment of the stem height (up and down) is available with headset spacers, place all but one spacer under the stem and the other remaining spacer above the stem. Then thread the headset adjustment bolt on top of that last spacer and tighten the headset/stem system according to manufacturer recommendations.
10. Some Time Trial bikes have integrated cockpits. That means they may not have a traditional stem and headset spacers for adjustment. But they all have some mechanism available for adjustment of bar and/or aero-bar height and reach. So you may have to consult your owners manual or your local bike shop to get the parts to make these adjustments.
11. Kit up with whatever you wear when you ride.
Making adjustments to contact points
Foot position
A good starting cleat setting is one that positions the ball of the foot on the pedal spindle. To accomplish this task, here are the steps.
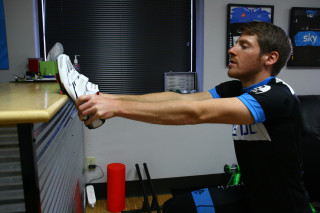
1. Put on your shoes.
2.Stand up.
3. Squat down with ball of foot weighted.
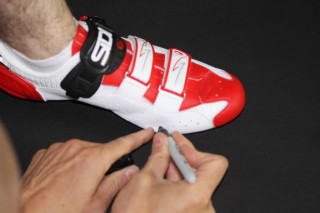
4. With the felt tip marker (or stickers) palpate and mark the first (inside) and fifth (outside) metatarsal heads (bones that are known as the ball of the foot). These bones are easily found directly behind the big and little toes.
5. Take off your shoes.
6. Now attach your cleat to the shoe so that the pedal spindle (marked on most cleats) bisects the 1st and 5th metatarsal heads. This is known as industry standard position.
7. Set lateral adjustment of cleat in the middle of the available range.
8. Set rotation angle of cleat so the shoe points straight forward. A good trick to do this is to use a flat tabletop and hang the shoes by the rear of the cleats. This creates a good visual perspective to determine if the shoe is set straight or not.
9. Make sure the cleats bolts are torqued to manufacturer recommended settings.
10. Put on your shoes
Saddle position
You will now set the saddle height and fore/aft by adjusting the seatpost in and out of the frame and adjusting the saddle fore/aft on the rails and/or along the available seatpost ranges (some TT bike seatposts have multiple positions for the saddle to allow for a greater range of adjustment).
With saddle position on a TT bike, the proper setting depends on whether you are racing triathlons, time trials and which governing body you’re competing under. In England and Wales all time trials, apart from National and British Championships, are overseen by the CTT who aren’t affiliated to the UCI and therefore don’t use their regulations. However, in Scotland, time trials are governed by the SCU, which is UCI affiliated and so their rules apply. UCI rulings do not apply to BTF, ITU or WTC triathlon events.
 Time Trials (UCI Regulated)
1. Using your 4 foot spirit level, place the tip of the saddle exactly 5cm behind the centre of the bottom bracket.
2. Then set the saddle height at the low end of the available range.
3. Mount the bike.
4. Sit squarely on the saddle and hang both feet straight downward with both knees fully extended.
5. Adjust saddle height higher until your heel barely scrapes the pedal at the bottom of the pedal stroke with the knee fully extended
Triathlons and non UCI regulated Time Trials
1. Using your 4 foot spirit level, place the tip of the saddle exactly in line with the centre of the bottom bracket.
2. Then set the saddle height at the low end of the available range.
3. Mount the bike.
4. Sit squarely on the saddle and hang both feet straight downward with both knees fully extended.
5. Adjust saddle height higher until your heel barely scrapes the pedal at the bottom of the pedal stroke with the knee fully extended
Aero bar position
You will now set the aero bar height and fore/aft.
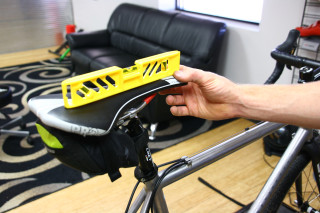
1. Place the 4 foot spirit level on the middle of the saddle and extend it outwards over the top of the elbow pad.

2. For an aggressive position suitable for a top-level triathlete or a road race time trial event, the top of the elbow pad should be at least a full fist width below the mid-point of the saddle (most fists are about 8cm). Often these athletes can be optimised with between a 10-20cm saddle to elbow pad drop. The range is huge. The degree to which you go here will depend on your comfort level for the full duration of the event.
3. For a top performing age-group triathlete, the top of the elbow pad should be about 8-10 cm below the mid-point of the saddle.
4. For triathlete that struggles with bike handling or has significant orthopaedic issues in the spine, the top of the elbow pad should be level with the mid-point of the saddle or maybe a couple centimetres below.
5. Remember, most stems are able to be flipped upwards. So if you cannot get your elbow pads high enough with the headset and/or elbow pad spacers, you can flip your stem upwards.
6. Once you have set the bar height, mount the bike and ride in the aero position.
7. Adjust stem length, and fine elbow pad height to arrive at your desired position.
8. A good tip is to start with the bars higher and with a shorter reach with respect to the saddle. Then go for a lower and longer position as you desire more speed and as your body adapts.
These tips are a starting point for proper positioning. They will probably get you close to an optimal position but, if you have concerns with the end position, it is always best to consult a professional fitter and get a personalised approach that can take into account all of the individual anatomical and physiological nuances of your body.