Riding in the correct gear will undoubtedly improve your overall cycling experience, keeping you on the bike for longer.
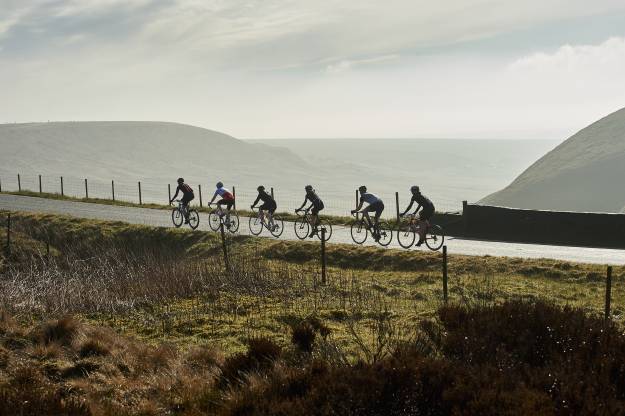
Here at British Cycling we want to enhance and support your riding as much as we can. One of the ways we do this is by sharing our knowledge and insight into cycling not only as a sport but also as a rewarding and fun pastime. So whether you ride a Pinarello just like Cav, a three speed with a basket or anything in-between, then you are sure to find use for these top tips on gear selection.
There was a time in the 1930’s and before, when the racing bikes used in the Tour de France would only have two gears, four at most. A wheel would have one or two sprockets on each side. To change gear a rider would have to stop and manually move the chain to another sprocket, or remove the wheel and turn it around to access the gears on the other side. Riders would often use this fact to their advantage and when to gear change was as important a tactic in bike racing as any of the modern era.
In the 1920 Tour de France, Firmin Lambot told fellow rider Phillipe Thys that the road ahead was hillier than it actually was. Thys, trying to gain an advantage stopped to change his gears. Lambot used this to his advantage and sprinted off into the distance. An enraged Thys chased Lambot and beat him in the sprint finish. It wasn’t until 1937 that the now ubiquitous derailleur gears were introduced to the Tour. This allows you to change gear on the move, something we all take for granted now. Even though a stop to change gear now and again would be a useful aid to recovery.
You’d be hard pushed to find a road bike with less than eighteen gears these days and mountain bikes will have anything between twenty one and thirty gears for you to get your head around. So why do so many people put their bike in top gear and push?
We’ve all seen the riders turning the pedals incredibly slowly, and to use a bit of cycling terminology they are ‘grinding’ it out, or pedalling at a low cadence. So let’s think about this for a second. Is making your riding as hard as possible going to make it either enjoyable or efficient? If you push a high (hard) gear your muscles will tire quicker, riding in a lower gear at a higher cadence is far more efficient and a high cadence coupled with a good pedalling technique (we’ll get to that, in the coming weeks) will see you flying along.
Much of the time you will find yourself overtaking the big gear brigade. Part of the problem for many riders is that it is far easier to keep the bike in one gear, rather than face the technical minefield of actually changing. Putting the bike in a ‘middle gear’ pre-ride and then sticking to a flat route can be a perfect solution for not understanding how to change. However it is preferable to know how the gears on your bike actually work.
What is cadence?
We will refer to cadence frequently when we talk about gear selection, but what does it actually mean?
Cadence is defined in the dictionary as ‘The beat rate or measure of any rhythmic movement’, so music has a cadence which is its beat. In cycling the cadence is the rate at which you turn your pedals. No surprise then that in gyms and at spin classes they use music to get you to ride at a preferred cadence, primarily to get you sweating. Up tempo music will result in a high cadence.
If you select a specific gear on your bike then on a flat road and in calm conditions, it will be your cadence that determines your speed. Eighty revolutions per minute (rpm) will produce more speed than sixty revolutions per minute. By changing gear during a ride your aim is to maintain your cadence at the optimum rate which is between 80 and 100 rpm.
How will I measure my cadence?
If there is an optimum cadence rate for efficient cycling, then how are you going to make sure that you are maintaining this rate? Many people will use a cycle computer to measure speed and many other useful pieces of data. These are also available with a function that measures cadence, and once set up correctly you will always have the cadence figure on your handlebars.
Remember, as a member of British Cycling you can save at least 12% in the British Cycling online shop (powered by Wiggle) if you decide a computer upgrade might be the answer. When your cadence drops below the optimum (80-100rpm) you can either push a little harder on the pedals or change into an easier gear, which if you maintain the same effort will see the cadence rise. Conversely, if you find yourself going over the maximum desired cadence then by changing into a higher (more difficult) gear you will do two things; reduce your cadence and go faster.
An alternative to the cycle computer is to manually count your pedal revolutions. While riding, time yourself for fifteen seconds, each time your left foot reaches the top of the pedal stroke you count (1, 2, 3 etc.). At the end of the fifteen seconds multiply the number you reach by four and you will have a rough estimate of your revolutions per minute. So, to maintain 80rpm you need to pedal twenty times in fifteen seconds. Be sure to only count the revolutions of one leg though, as if you count both you will get an inaccurate result, which will in fact be double your actual rpm.
Watch our ‘What is cadence’ video which shows some efficient cadence rates using a Wattbike. If you know what 90rpm looks like then you can make it your aim to match it when you ride.
You will notice that the cadence of the music matches the pedalling cadence. So you could try and embed a piece of music in your mind and refer to it when riding.
Gear changing
The actual mechanics of ‘how to change’ will vary dependent upon the type of bike and the gear shifters with which it is fitted. Any good bike shop should take you through the process for ‘your bike’ when you collect it. If they don’t then ask them, as without this knowledge you really are affecting your ability to get the most out of your riding. You could also find a quiet stretch of traffic free road and practice. By doing this, you will not only master the technique but also get an idea of what the different gears feel like on your bike.
Now, let’s look at some commonly used gear systems found on bikes today. As a general rule you will find two or three chainrings at the front of the bike attached to the pedals via the cranks and to the bike through a bottom bracket, which is a system of bearings that allows the pedals to turn. These chain rings will vary in size from large on the outside to small on the inside.
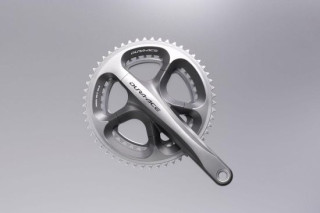
Above is an example of a double chain set. Commonly found on bikes designed for road riding and commuting.

A triple chain set gives a wider range of gears and are usually found on mountain bikes. They are however becoming more common on road bikes designed for riding in very hilly terrain.
When the chain is engaged in any one of these rings it gives you a selection of gears limited by the number of sprockets at the rear of the bike. Changing into a smaller chainring at the front will make pedalling feel easier, as you have engaged a lower set of gears. So the larger the chainring the higher the gears, or the harder it will be to pedal. Gear changing is a balancing act, matching your speed to the correct gear, or matching your gearing to your speed. When changing between chain rings the difference in the gearing will feel quite dramatic as the rings have a large variation in size. So the rule with your gears at the front of your bike is, the smaller the chain ring the easier it will be to pedal. At the rear of the bike there will be a cluster of sprockets numbering seven to eleven dependent on your particular bike.
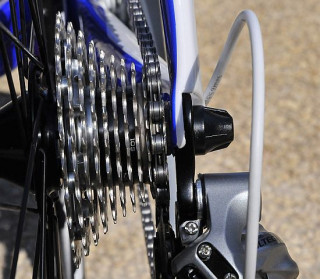
Above is a typical sprocket set. This one is ten speed from Shimano.
You should notice that the difference in size from one sprocket to another is quite small, so when changing up and down these sprockets the changes will feel less dramatic, when you compare them to changes at the front. However selecting the correct gear is vital if you are going to maintain an efficient cadence. The rule when changing the gears at the rear of the bike is, the larger the sprocket the easier it will be to pedal.
- It is always worthwhile to practice your gear changes to feel what it is like for your bike. Once you feel confident then use the tips below to get the most from your gear selections:
- Try to avoid looking down to know which gear you are in, take time to practice gear changes so you know how they feel. Also get your gears set up correctly to minimise problems when shifting. If you are looking at your gears then you are not concentrating on the road or trail.
- Get to know the range of gears that you have on your bike. On a rough surface you might want to lower your cadence with a harder gear to reduce chain movement, too much chain movement can lead to a chain coming off, which is never good. On a smooth surface you might want to make your gears easier to give you chance to recover (get your breath back).
- Looking forward when changing gears will allow you to judge the terrain in front of you. Is there a hill coming up? Is there an imminent change in the road surface? Is the wind direction about to make riding more difficult? Don’t underestimate the impact the wind will have, as 80% of your energy when riding is used just to overcome your resistance to the air.
- Keep pedalling throughout the process of changing gears. If your gear change is planned, then just before it you can aim to increase your speed slightly. By increasing your speed you will reduce any possible lag in speed just after the change. Thus maintaining your momentum.
- When changing gear you should momentarily ease the pressure on the pedals. This will help with the smooth movement of the chain. Too much pressure on the chain by standing on the pedals for example may result in the chain coming off, or in extreme circumstances snapping.
- To reduce the chance of the chain slipping off the bike, change gears one at a time. This is particularly important when changing between the front chain rings on a triple chain set. It is also preferable to change gears whilst seated in the saddle. This reduces chain tension and will result in a smoother change.
- Keep changing your gears to make sure your legs are not over or under rotating. A good cadence is considered between the range of 80-100+ rpm. (Watch the ‘What is cadence’ video to see what these cadences look like)
- Before a hill the temptation is to automatically change into your lowest gear. Try not to change your gears too quickly or too much. By changing too early or too much you can lose that precious momentum which will carry you into the hill. Try to pick a gear that will allow a cadence of at least 80rpm throughout the time you are going uphill.
- Change your gears into an easier gear when slowing before a corner or stopping, this will help when exiting a corner or restarting, allowing you to accelerate up to speed more easily.
So the next step is to practice the next time you ride your bike. If you have a static bike (Wattbike/Turbo trainer/Exercise bike) you can practice familiarising yourself with different cadences and what they feel like. Remember there is a choice here, you can either change gear to maintain an efficient cadence or increase your effort, it will really depend on what the purpose of your ride is.