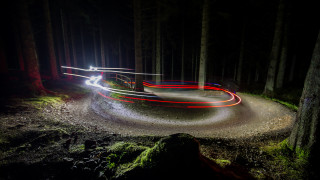
With modern high powered, lightweight and long running lights, mountain biking in the dark is a must-do winter cycling activity. Relatively tame trails in daylight become far more thrilling propositions in the dark and there’s a real sense of adventure in heading into the woods or onto the hills after dusk.
Choose your route
Even if you’re familiar with the trails, if you’re new to mountain biking in the dark, dial down the technicality until you are confident with your light set-up. If you are riding on unfamiliar trails, take it steady and maybe, if riding graded trail centre routes, ride a level lower than you normally would in daylight.
Bar and helmet
The best lighting combination is a powerful and wide beam light on your bars and a lower powered but more focused spot on your helmet. The bar light will illuminate the trail ahead whereas the helmet light will improve depth perception and ensure wherever you look is lit up. It’s worth tethering lights to your bike or helmet. Helmet-mounted lights are particularly easy to accidentally knock off and a simple tether can prevent you from losing an expensive light.
Internal vs external batteries
Lights with internal batteries are neat, you don’t have to worry about routing cables and are easy to swap between bikes. However they can be heavy and tend to have lower burn times. Lights with external battery packs are lighter to mount on your helmet, often have longer burn times, you can protect the batteries from the cold but the cables can be annoying.
Power
The power of a light is usually expressed in lumens but don’t always think that more is necessarily better. Beam pattern is equally important as a highly focussed spot can have a very high lumen rating but won’t be much good as a bar-light where a wider flood is needed. Very high powered lights will also tend to have lower burn times and, if riding in a group, can ‘wash out’ the lights of riders with less powerful set-ups.
Boost your burn time
Manufacturer’s claimed burn time may not be very accurate. Temperature, age and number of charging cycles can all reduce burn time. Increase the burn time by keeping external batteries warm in your pack or using a set of tennis sweat bands to insulate lights with internal batteries. Make sure you keep the actual light body uncovered though as they get very hot. Always toggle to lower power settings when climbing or on less technical sections of trail.
Calibrate
In the same way you’d take time to tune your suspension, calibrate your lights to your bike. Jump on your bike and get a friend to hold the rear wheel between their legs and support the saddle; this should allow you to adopt a ready position. Whilst the bike is supported, adjust the beam centrally over the point in front of you where you would normally look; you’ll probably find this is 10-15 metres in front. Keep the bar-mounted light on and set the position of your helmet mounted light, this needs to be slightly in front of where the bar mount is pointed.
Plan and packing
Don’t forget to charge your lights and, as many can take a couple of hours or more to charge, do it the day before your plan to ride. If you’re carrying a spare battery pack, make sure it’s somewhere accessible in your pack and you know where all your spares and tools are located. Carrying a spare ‘get you home’ set of lower power lights can be a good idea. If there are road sections on your route you may need to tweak or add to your set-up to comply with Road Vehicles Lighting Regulations. You will definitely need a rear facing red light and be able to dip your main light to avoid dazzling on-coming traffic.
You're likely to finish wet and muddy so unless you want to be confronted by festering kit and a rusting bike, think about your post-ride clean up. Have a hose in a lit area and a few bin-bags ready to go and, although a steaming cup of tea will be calling you, it only takes 5 minutes to clean your bike.
Buddy up
Always try and ride with at least one friend in case of an accident and, even then, let someone know where you’re riding and the time you should be back by.
Go electric
With limited time and slippery trails, an e-MTB can make a lot of sense for getting the most out of winter night riding. You'll be able to cover more distance, avoid some hike-a-bikes and maybe even look forward to climbs!